Mold Drawings
Click the links below to view the drawings for the mold:


Click the links below to view the drawings for the mold:
The use of this standard batch sheet came about because before I used it, I had to copy down the columns and target data each time by hand in the lab notebook. As you might guess, copying the blank form by hand each time before making a wax batch gets rather tedious.
In the beginning, as things were still being fine-tuned and adjusted, the handwritten individual forms were appropriate because each batch differed very slightly. However, after having centered in on this particular process and after having used it many times over several years, then the standard form became appropriate.
Back at the very beginning, the batches were "free running" in that the time allowed was open-ended. In other words the total time for each batch varied somewhat, being dependent upon taking all the time needed to successfully cook in the precipitate produced from each of the hydrated aluminum additions. Back then , even the total number of these additons was not standardized. Some early batches used only (12) or (14) additions, and some batches used as many as (20). These batches have always been about the same size, they produce two cylinder castings with enough leftover wax to make about another half of a cylinder. The total amount of hydrated aluminum added to this batch has always ranged from around 10 to 12 fl oz. Total time for these early batches ranged anywhere from around 2 hours to sometimes close to 3 hours. It is now standardized at 2 hours, and 26 minutes, always using 16 additions of hydrated aluminum measured per the schedule starting with 10.75 fl oz.
Larger batches were attempted a few times, and it was found that many other factors creep in when doing this. The overall quality of the resulting wax was low, the blanks were noisy, so I simply went back to the smaller batch size which I know works properly.
The total amount of hydrated aluminum added always has been roughly the same. Certain brands of stearic work well with 11 fluid ounces of hydrated aluminum for this batch size. The particular brand and type of stearic being used currently as of 2016 works best with 10.75 fluid ounces of hydrated aluminum solution, added in 16 portions. The type of lye used also can slightly change the overall amount of hydrated aluminum liquid added.
The batch sheet uses lots of shorthand abbreviations for things which go back to some of the original tests and methods used along the way of learning. Rather than change the terminology, I have found it easier to just keep the original nomenclature intact.
I will do my best in the following explanation to clarify each one of these shorthand references. Note: The following is a very long, involved, convoluted explanation. It has been written in an attempt to make the use of this batch sheet available to all.
For those who wish only a short and rough idea of it: It can all be summed up this way: The batch sheet works as a dynamic guide to making brown wax. It shows when the batch is on schedule and it indicates what to do if or when it drifts off of schedule. When followed as closely as possible, this schedule provides excellent uniformity from one batch to the next.
As for the weight units used, each unit is equal to .2674 grams. So, when ever you see a weight specified in "washers", just mulitply that by .2674 to get the weight in grams.
The term "Splash" refers to the addition of a small amount of hydrated aluminum solution to the melted stearic acid. There are (16) such additions which take place over a time of about 1.5 hours. Each such addition is numbered in the "Splash" column on the batch sheet.
To understand this clearly takes a bit of translation. It is a simple enough concept to understand, but the way it's presented here can be very confusing. It's confusing due to the method used. The method makes things easy, simple, accurate, and fast while doing it, but it also makes explanation somewhat convoluted.
The first 10 additions are clearly labeled in fluid ounces in the column which has "10.75 fl. oz. start" at the top.
Due to the tapered shape of the bottom of the plastic jar used to measure the hydrated aluminum, after addition #10, the units change to inches. The place on the jar where the shape changes from straight cylindrical, to tapered is called "Top of Bevel".
In order to be useful elsewhere for this method to be exactly duplicated in any other place, at any time, additions 11 through 16 must be translated to fluid ounces so that all (16) additions are specified in fluid ounces.
Here are additions 11 through 16 in fluid ounces:
| Addition | fluid ounces |
| #11 | 2.25 |
| #12 | 1.75 |
| #13 | 1.25 |
| #14 | 0.75 |
| #15 | 0.375 |
| #16 | 0.0 |
All of these (16) items are a measure in fluid ounces of how much hydrated aluminum solution remains in the container AFTER each addition. The last one (#16) is zero because prior to dumping in #16, there is .375 fluid ounce left in the jar and addition #16 is the pouring in of that amount, leaving the container empty. That is shown on the sheet as "All In".
An additional note about these portionwise additions is that if you want to know what the individual additions are, simply subtract what's left over after each one, from the amount above it.
For instance: It starts with a total of 10.75 fluid ounces. After splash #1, there are 10 fl oz remaining, so that first addition is .75 fluid ounce. You can go down through the whole table then, and translate each addition into its exact amount. To check them, make sure they all add back up to 10.75 fl oz
From there you could go on to translate from fl. oz. to milliliters and then use a pipette, burette, or any other convenient way to add those (16) precise amounts at the correct times, at the correct temperatures.
I just have been using the plastic jar, the string, and the measuring cup as the easiest, simplest, most available way to get it done reasonably accurately. (see the waxmaking video) However, with the information given here, many other methods are possible.
See the batch summary in the "Tech Musings" section of this website for additional reference.
Some overall generalities which apply to making this type of brown wax are:
1) The amounts of hydrated aluminum added throughout the cooking tend to be larger near the beginning, and smaller near the end. The temperature of the melted stearic when each addition is made tends to increase as the batch progresses. The time intervals between additions tend to increase as the batch progresses. However, this is not strictly adhered to and it has been found that certain patterns of added amounts at various times and at various temperatures throughout the cooking will produce quite noticable differences in the final product. I call this the "Time/Temperature/Amount" profile. Many varying profiles have been tested, and this one outlined here on this batch sheet has been found to get the best results.
2) The general trend is to heat the melted stearic to at least 190 C before adding hydrated aluminum which is at room temperature. Upon adding the hydrated aluminum solution, the temperature drops down to around 130 C as the water boils off, and as the sodium and aluminum stearate forms a precipitate. The temperature gradually rises as the water gets boiled off. It continues to rise after the water has fully boiled off. It is during the time after the water is gone, that the precipitate dissolves in to the melted stearic. As more and more precipitate is dissolved in, the saponified stearic starts to turn color. First yellow lemonade color, then later more of a brown. As the stearic saponifies, higher temperatures are seen at the point when all the precipitate is dissolved in. Less heat is required. The reaction starts to become exothermic. So much so, that later on during the high-temperature end of the cooking (220 C, 250 C, 270 C) the batch can run away and go off-scale high temperature if one does not closely monitor the heat and the temperature. The high temperature of 270 C is needed, but also the situation requires care not to allow it to run away much higher than that.
3) The goal of each of these temperature rises is to use just enough heat so that when the temperature reaches the specified number on the schedule, the elapsed time will match that specified on the schedule. The ideal goal is to have the precipitate fully cooked in by the time for the next addition and this is supposed to happen at the temperature shown on the sheet. This of course cannot happen perfectly each and every time. When the batch does start to wander off of schedule slightly, it is better to meet the temperature exactly and allow the time to go "late". If too much heat is used and the temperature arrives too early, one is forced to make a quick decision "on the fly" as to whether to just add the next addition and keep going, or to hold off and let the temperature go high and continue cooking. It has been found that missing several time points, being late by a few minutes, and also being high on the temperatures by 10 to 15 degrees C does produce inferior brown wax.
It works better to be somewhat easy on the heat so that the temperature cannot ever be in error more than maybe 5 degrees C at most if it does go over. Typically, it has been found that times can be allowed to drift "late" by up to a minute or even 2 minutes in certain places in the schedule, and by so doing, the temperature points in the schedule can be met exactly. So, this is a way of maintaining temperature always very close on schedule, by allowing time to drift late. Once time does drift late, then applying a very small amount more heat will bring the batch back on schedule within the next few additions on the sheet. This is well illustrated on the example sheet. Throttling the heat is the method used to "steer" the batch, and to keep it on schedule.
The drifting of temperature is not well shown on the example because the particular wax batch shown just so happened to have all the temperatures work out exactly correct. More often though, at least one or two of the temperatures will drift 5 or even 10 degrees C high, which gets noted on the form as it happens.
In general, as long as everything ends up at the proper time and temperature at the end of the cooking, with the batch right on schedule, it's no big deal if a few times and temperatures are "busted" along the way in a few places. Time can drift late by up to 2 minutes. Times should not drift any more than 2 minutes at most, because if it gets much later than that, it's quite difficult to bring the batch back on schedule without seriously busting the next temperature way high, and that will produce inferior wax.
4) Ideally, the precipiate will be fully cooked in when the time and the temperarure arrive for the next addition. This cannot always be exactly realized. Most of the time it can be. But sometimes some small amount of the solid precipitate will still be floating around when the next time/temperature point on the schedule arrives. This is where experience is the guide. It has been found that if only a few small specks are floating around and are not fully dissolved in, it is ok to add the next hydrated aluminum portion. However, this trend will build up and amplify itself if given the chance. If more and more undissolved precipitate is seen at subsequent additions, this can lead to a poor wax batch. If this starts to happen, more heat helps get that precip dissolved in as it should be. But, in so doing, then one must watch very carefully that the next temperature point does not get exceeded, nor the time allowed to be busted by being way too early.
In an extreme case where lots of extra heat must be used in order to dissolve in some very stubborn precipitate, increase the heat way up and stir. Make sure the temperature never exceeds the next point in the schedule. If the temperature gets up very close to the next listed tempertaure in the schedule and several minutes early, with solid precipitate floating around, then the container can be removed from the heat, stirred, and allowed to cool for half a minute or so. Let the temperature decrease 20 degrees C or so, then start again on the heat, stirring, and continue.
In this way, stubborn precipitate can be fully cooked in on schedule without ever busting the next temperature on the sheet. If it is taken off the heat and allowed to cool too much, then it is also very easy to get way behind schedule and then it is very difficult to catch up again.
5) This method of having a schedule to follow to help each batch be consistent should naturally tend to maintain itself. Since this schedule was arrived at using the same equipment as has always been used here, if a moderate amount of heat is used, it just naturally tends to arrive at the temperatures and times and with precipitate fully cooked in as shown on the sheet. This type of method should have inherent stability, and not be difficult to adhere to. There will, of course, always be some minor corrective action required, and small adjustments made to the amount of heat applied along the way, but these should be relatively minor, and the trend should be one of the whole works more or less following the sheet without extreme effort.
6) By following this general method, it is probably possible for anyone to come up with their own ideal schedule which will be suited for their particular batch size, and their own unique equipment. The examples shown here are unique to this particular batch size, with this particular set of equipment, and these particular brands of ingredients. Changing ANY of the above will change the outcome.
As the cooking of the wax batch progresses, the sheet gets filled out. Having a straight edge positioned under each line on the sheet as each step is done, and then moving it down to the next entry helps in seeing what has been done, and what is next. I keep an accurate clock close by the wax as it cooks, and another clock at the table where the sheet is, so that the actual times can be filled in on the sheet as the batch progresses.
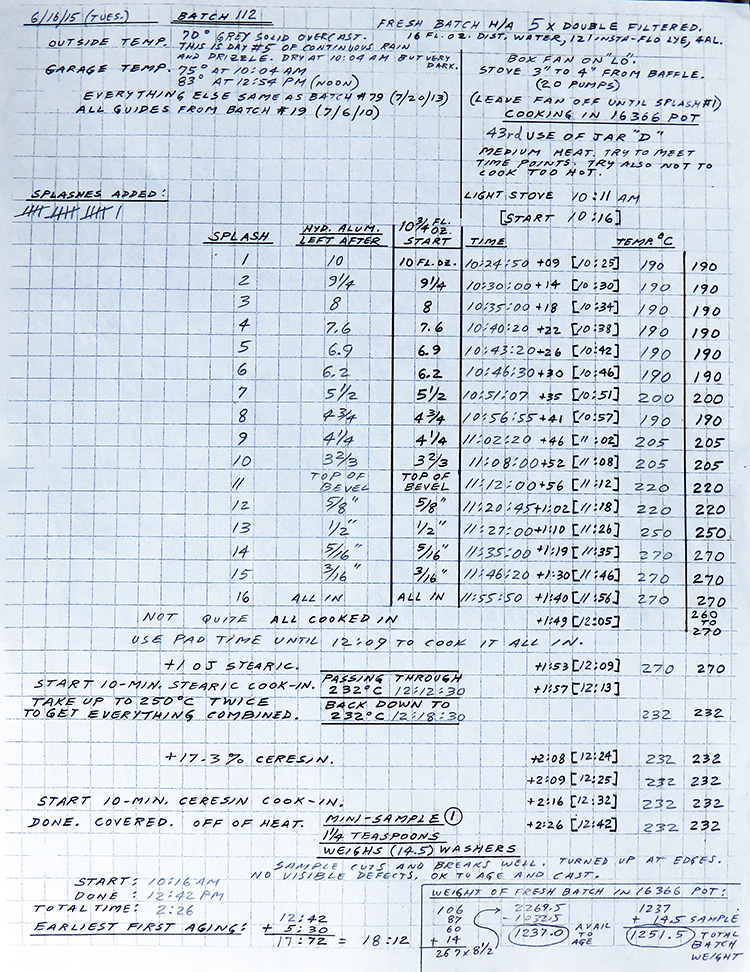
Looking at the blank form starting from the top, first the batch number and date are entered and just below that are some ambient temperatures and a little weather report. On the right side at the top is a short description of the type of hydrated aluminum being used. Below that on the right side are a few reminders about the setup.
The first time to be filled in is "light stove", and you see that happens at 11 minutes after a given hour. The minutes are part of the blank form, but the hours are left blank to be filled in when it is known when the starting time will be.
Usually I'll be doing the final filtering of the hydrated aluminum (called H/A on the sheet), then measuring it out at 10.75 fl oz into measuring jar "D" and noting how many times this jar has been used. Then I make sure the stove is fueled up and that the 211.8 grams of stearic has been loaded into the cooking pot, and that the weight has been checked. Only after knowing that everything is ready do I go ahead and fill in the hours into the blank schedule.
You will notice that the stove gets lit at 11 minutes after the hour and the batch is started cooking 5 minutes later at 16 minutes past the hour. This is to allow sufficient time for the gasoline powered camp stove to get up to temperature burning clean.
A glance at the filled-out sheet for batch #112 shows that this batch started with lighting the stove at 10:11 am, and the pot was set on the flame at 10:16 am.
All times in brackets such as [start 10:16] or [10:25], designate the target times. Just to the left of the bracketed target times is the total elapsed time. You will notice that the time for the first addition of hydrated aluminum is targeted for [10:25] and that is at the elapsed time of +09, which means 9 minutes after the pot was set on the fire at [10:16]
So, for the first 9 minutes the solid flake stearic gradually melts and once in a clear liquid state, the temperature begins to rise. If all happens on schedule as it did during batch 112, the time at which the melted stearic just reaches 190 C will be at or very close to 9 minutes elapsed time. For batch 112, this happened 10 seconds early at 10:24:50, which you will see filled in under the word "Time". Then, over on the right you will see that the temperature met the expected target of 190 C and that actual working temperature was entered under "Temp. C"
As stated before in this text, batch 112 was very lucky in that all the actual temperatures matched the targets. Usually one or more will miss slightly and those are noted and a curved arrow is drawn pointing from the target to the "busted" actual temperature which is in slight error from the schedule.
So, right at 10:24:50, the first addition (splash #1) is poured in and the pot is again covered. After entering the data on the sheet then splash #2 is measured out, checked, and covered for use 5 minutes later at [10:30] which is at a total elapsed time of +14 minutes.
Again, the temperature is watched closely as is the cooking-in of splash #1. It just so happened that splash #2 worked perfectly, meeting both temperature and time exactly at 10:30:00 at 190 C.
Then measure out splash #3, check it, cover it and watch #2 cooking in.
You will now see the batch start to drift a bit for splash #3. Note that the target time for it is [10:34], but that it did not go in until 10:35:00 at 190 C. So, splash #3 met the temperature exactly at 190 C, but by waiting an extra minute and going late in order to be at that temperature, not some cooler temperature which it was one minute earlier at the target of [10:34].
As this happens, one thinks to one's self: "We met the temp ok, but we are now down one minute!...better get back on schedule"
Now watch what happens on splash #4: It is met at 190 C exactly, but late by 2 minutes and 20 seconds! That is late enough to cause concern because it exceeds 2 minutes. Better add some heat and get this back on schedule!
Splash 5 shows that we are catching up now after having added a bit of extra heat. Again we hit the target temp exactly, and we have gained a bit of time, being only 1 minute, 20 seconds late now. Better.
Splash #6 is better yet because the temp is perfect at 190 C, and we have gained more time, now only being late by 30 seconds. (Almost back on schedule!)
Splash #7 is more like it! Hit the temp at 200 and only 7 seconds late now.
After splash #7, the heat must be reduced in order to hit the next temp of 190 without going over.
Splash #8 hits it just right at 190 C and now 5 seconds early at 10:56:55 for the target of [10:57]. Not bad. 41 minutes in and completely back on schedule with no busted temperatures.
Splash #9 then goes 20 seconds late again, but meets the temp of 205 C just fine.
Splash #10 makes up that late time and hits everything on the mark. 52 minutes in and the batch is on schedule.
Splash #11 hits another bullseye. This marks the transition point between the early low temperature portion of the cooking, moving on into the high temperature range toward the later stage of cooking. It is good to be on schedule as closely as possible at this point due to the fact that from here on out, the precipitate becomes noticeably more difficult to fully dissolve in. Splash 11 foams up very tall in the container. It usually gets up to within an inch or so of the top of the pot as soon as the lid is removed to start stirring it down and cooking it all in. This is why a tall, narrow container is required, because at certain points during the process, the contents goes almost completely to an "all foam" condition and if the container is too small, it will blast the lid off and boil over. Notice also that the temperature for splash 11 is 220 C.
Splash #12 drifts 2 minutes and 45 seconds late again, but with the temp fine at 220 C. (getting ready now for the high temperature end of the cooking)
Splash #13 makes up some time and is only a minute late now with the proper temp of 250 C.
Splash #14 makes up the remaining minute and is on time and at the full 270 C.
Splash #15 is 20 seconds late, but right at 270 C.
Splash #16 happens 10 seconds early at 11:55:50 instead of the target time of [11:56], but at the full 270 C.
Not bad, 1 hour and 40 minutes total elapsed time, and on schedule within 10 seconds. And early to boot! Early is good at this stage.
However, we now see that after splash #16, ideally, all solid precipitate should be cooked in because the sheet says "All Cooked In" at a target time of [12:05] which is 9 minutes after having added splash #16. Did not quite make it this time, as there were still a few chunks floating around needing some more cooking in. So the words "not quite" are written in before "All cooked in" to show what actually took place at target time [12:05]
That means there are now 4 more minutes of emergency "pad time" which can be used to do this extra bit of cooking. I was too busy doing that at the time, but later on wrote in "use pad time until 12:09 to cook it all in". Notice that the target temperature shown for [12:05] is a range from 260 C to 270 C. This provides a reminder that a bit less heat is needed if all precipitate is completely dissolved in by [12:05]. In this case it should be allowed to simmer at 260 C for the 4 minutes before adding the last portion of stearic. If however, there is still solid precip floating around at [12:05] as was the actual case with batch #112 as shown in the example, then the higher temp of 270 C should be used. In short, there is no need for excess temperature here, if the precipitate is all finished dissolving in. Easing up on the heat here helps maintain very quiet wax.
Next entry on the sheet is "+1 OJ stearic" which means to add 70.6 grams of stearic. At this time of [12:09] all of the precipitate MUST be cooked in, and that means that the work during the last 4 minutes has used whatever heat was required to get it done, and with lots of stirring. This was accomplished by going no higher than 270 C, but a few times in the past, 275 C has been used and even once 280 C, but those temperatures are rare and very seldomly required.
The solubility increases as temperature increases, so this can be used to help dissolve in all of the precipitate.
After the 70.6 grams of room temperature solid stearic has been added, that causes the temperature to decrease markedly. This added stearic must be melted in, and the whole heated in order to cook it in for ten minutes. This ten minute cooking-in period starts as the mixture passes through 232 C. The sheet says "Start 10-min stearic cook-in" and then "Passing through 232 C", where you will see the time of 12:12:30 filled in. The target time for that is [12:13].
During this ten minutes, the batch is heated to 250 C and taken off the heat and stirred thoroughly, then taken under a 100 watt lamp to very closely examine for any tiny small precipitate bits floating around. Then it is put back on the heat and again taken up to 250 C for a 2nd time, and again taken under the inspection lamp after a good stirring. At this point it should look just like a hot cup of the blackest coffee you have ever seen. There should be absolutely no particles floating in it. It is a very dark, very thin watery liquid at this point. The reason for the two temperature excursions to 250 C with lots of stirring is to make absolutely sure that all of the precipitate is fully dissolved in. The two extra trips up to 250 C provide two last and final periods of increased solubility to make sure that gets done.
It is then allowed to cool down to 232 C, which is shown to have happened at 12:18:30. Once back down to 232, it stays there at that temperature until the next step at [12:24] which is to add 17.3% ceresin. That happens to be 59.1 grams of ceresin. From this point onward, the wax batch never gets heated beyond 232 C. The high temperature period has been completed.
The adding of the ceresin is targeted anywhere within the minute of [12:24] to [12:25]. This target covers a whole minute because getting the ceresin in there without making a mess and causing hot wax to splash out takes a bit of care and time.
There are now 7 minutes in which to melt the ceresin in and get the batch back up to 232 C before the start of the ten minute cooking-in time for the ceresin which begins at [12:32]
The ceresin cooks in for those 10 minutes, being gently stirred a few times. The batch is finished by [12:42]
Total elapsed time is 2 hours, 26 minutes.
A 1.25 teaspoon sample is poured off for later testing.
The time is noted. 5.5 hours later after the batch has cooled and hardened, it will be ready for the first aging step.
That finishes brown wax batch #112, made 6/16/15.
Refer now to the back of the batch #112 sheet.
This shows the (2) aging steps which need to be done to this wax in order to make it ready for casting. Also shown after the aging steps are the castings themselves, which made blanks M337 and M338.
It has been found that although this wax can be cast into blanks immediately after having been made, that the odds of making decent castings which yield up good quiet blanks are much better after this wax has been melted and hardened a few times after having been made.
Statistics show that casting the wax right away tends to produce noisy blanks more often than casting it after it has been conditioned. The conditioning goes a long way toward increasing the odds of success.
So, first it is re-melted and raised to 232 C and held there and stirred gently a few times for 20 minutes.
Then it again is allowed to cool and harden for 5.5 hours minimum time.
Then after hardening, it is again heated to 232 C, stirred and held there for 5 minutes and allowed to cool for 5.5 hours minimum.
These (2) extra steps are worth doing because by doing them, one avoids casting some noisy blanks.
For added purification, each time this wax is allowed to cool and harden, the top surface of it is scraped clean and the resulting fine dust is vacuumed out. This dust contains a few microscopic aluminum particles.
We loose a bit to vapor during these steps. This time we lost 8.5 washers to vapor. (.2674 x 8.5 = 2.27 grams lost during aging)
Following along on the sheet, it can be seen that there ended up to be 1228.5 washer weight available to cast.
Then casting #337 used 459 of that, for 769.5 left after casting.
Then casting #338 used 450.5 of that, for 319 left after casting.
Then the remaining leftover wax chunk was taken out of the pot and weighed separately and that weight was 318, for a weighing error of 1 washer, which is .2674 grams. Not bad considering that we started with 328.5 grams of wax to cast.
Those left-over wax chunks from various batches are saved and used along with the cutoff ends of castings to make the scrap run blanks described in full detail in the "Tech Musings" section of this website.
This section of the Richards Laboratories website is an eclectic grouping of highly esoteric bits pertaining to the overall methods and philosophy used to produce these blanks. It is intended for those who are interested in the details.
MR. RICHARDS AT THE CLOSE OF 31 YEARS OF THOUGHT AND RESEARCH, THEN 5 MORE YEARS OF WORK MAKING BROWN WAX CYLINDER RECORDING BLANKS.
---AUGUST 16, 2013
This is the longest continuous session of labor he ever performed
from Macbeth, Act IV, Scene 1: A dark Cave. In the middle, a Caldron boiling. Thunder.
Enter the three Witches.
First Witch
Thrice the brinded cat hath mew'd.
Second Witch
Thrice and once the hedge-pig whined.
Third Witch
Harpier cries "'Tis time, 'tis time."
First Witch
Round about the cauldron go;
In the poison'd entrails throw.
Toad, that under cold stone
Days and nights has thirty-one
Swelter'd venom sleeping got,
Boil thou first i' the charmed pot.
ALL
Double, double toil and trouble;
Fire burn, and cauldron bubble.
Second Witch
Fillet of a fenny snake,
In the cauldron boil and bake;
Eye of newt and toe of frog,
Wool of bat and tongue of dog,
Adder's fork and blind-worm's sting,
Lizard's leg and howlet's wing,
For a charm of powerful trouble,
Like a hell-broth boil and bubble.
ALL
Double, double toil and trouble;
Fire burn and cauldron bubble.
Third Witch
Scale of dragon, tooth of wolf,
Witches' mummy, maw and gulf
Of the ravin'd salt-sea shark,
Root of hemlock digg'd i' the dark,
Liver of blaspheming Jew,
Gall of goat, and slips of yew
Sliver'd in the moon's eclipse,
Nose of Turk and Tartar's lips,
Finger of birth-strangled babe
Ditch-deliver'd by a drab,
Make the gruel thick and slab.
Add thereto a tiger's chaudron,
For the ingredients of our cauldron.
ALL
Double, double toil and trouble;
Fire burn and cauldron bubble.
Second Witch
Cool it with a baboon's blood,
Then the charm is firm and good.
Some definitions:
Stearic acid is known as a "fatty acid". C18H36O2 (called also just "stearic" in industry)
Saponification: Conversion to soap.
Saponify: To change a fat or an oil into soap by treating with an alkali. Saponification is the hydrolysis of any ester into the corresponding alcohol and acid. Hence, any hydrolysis.
Soap: Normally thought of as a cleansing agent. Soap is the end result of the reaction between a fatty substance and an alkali. It is the result of that acid/base reaction. This particular variety of soap used to produce the brown wax contains both sodium and aluminum metals. It also does not dissolve in water.
Edison said of it: "It's a soap that doesn't lather".
282.4 grams stearic acid (total)
211.8 grams of stearic acid is saponified using 10.75 fluid ounces of hydrated aluminum solution.
The remaining 70.6 grams of stearic acid is added after the initial 211.8 grams has been saponified.
Hydrated Aluminum Solution:
16 fluid ounces distilled water.
32.4 grams of lye (sodium hydroxide NaOh)
1.07 grams of aluminum metal (6 inch square x .0005 inch thick foil)
Method:
Lye is added to water and stirred until completely dissolved. This creates heat. Solution is allowed to cool a bit before adding the aluminum. The aluminum foil square is torn into 3 strips each 2 inches wide and those are rolled up into marble-sized balls.
After the lye/water solution has cooled a bit, the first foil ball is dropped in. As the aluminum dissolves in the lye/water, more heat is created, and more cooling time is required. The foil is added in 3 separate balls in order to keep the overall amount of heat down low enough not to crack the glass. Several minutes are allowed between adding each foil ball. After the 3rd foil ball has been added and after the final solution has cooled down, then it is filtered using 2 coffee filters together. The solution gets filtered that way 3 times. Then it is stored in a plastic jar overnight to settle. The following video shows the aluminum dissolving in the lye/water solution:
The next day, it gets filtered twice more. A total of 10 coffee filters is used for these 5 times of double-filtering. The solution should be water-clear at the time of being used to make brown wax.
The 10.75 fluid ounces of 5X double-filtered hydrated aluminum solution which gets added in 16 portions to the 211.8 grams of melted stearic acid saponifies the stearic acid. The resulting compound contains both sodium stearate and aluminum stearate. The aluminum helps to make the blank shiny and smooth and when the amount of aluminum is just right, the noise level has a distinct low spot in the graph which shows aluminum amount plotted on the "X" axis, and overall background noise level plotted on the "Y" axis. Either an excess or a deficiency of aluminum or saponification can result in more surface noise than ideal. Each different brand of stearic and each different base used to make the stearic has a very slightly different balance of these factors in order to arrive at the lowest possible surface noise. Stearics are available in different bases such as animal tallow, palm, and various vegetable bases. Each has its own balance requirements when making brown wax from it.
Back 120 years ago when brown wax blanks were modern technology, the only type of stearic available then was made from animal tallow. Richards Laboratories uses an available modern stearic which is made from animal tallow.
After completion of the saponification, the remaining 25% of the stearic acid is added and thoroughly cooked in. This increases the capillarity, and decreases the viscosity of the whole. It becomes a very runny, watery consistency, very thin and very liquid. To this saponified and thinned stearic is then added 59.1 grams of ceresin wax. The ceresin is allowed to cook in for 10 minutes at 232 degrees C.
The ceresin is tempering. It softens the wax. The amount of ceresin can be varied to obtain harder or softer recording blanks. A good "hot day" blank might have around 17.3% ceresin, while a better "cool day" blank might contain 18.5% ceresin. At a usual normal room temperature somewhere between 72 and 75 degrees, either of those values will work fine, the 17.3% has a bit less noise than the 18.5%.
The ceresin also serves to make the metallic soap compound non-hygroscopic. That means it does not absorb moisture.
The yield is 334 grams of brown wax. At first this might seem rather odd, because if the weights of all the solids are added up, the result is 282.4 grams stearic + (32.4) x (10.75/16)=21.77 grams lye + (1.07) x (10.75/16) = .72 grams aluminum + 59.1 grams ceresin wax totals up to 364 grams. But the total yield is 334 grams.
30 grams is lost to vapor in this open process.
Each cylinder casting uses 120.3 grams of brown wax.
Disclaimer: This process is very dangerous. It creates hazardous fumes, and there are high temperatures involved. Risk of serious injury is ever-present, and all of the above information is provided for explanation purposes only.
The following video is a brief overview of the ingredients and process for making the brown wax:
A typical wax batch in the present process can cast 2 blanks. After casting those two blanks, there's enough wax left over for about another half of a blank. That leftover wax is then weighed and saved.
Same for the cutoff ends of the cylinder castings. That leftover wax plus the cutoff ends are scrap wax which can be used to make more blanks. There are many references in Edison's original process which tell of adding a small amount of scrap wax into a fresh batch of wax.
So far at least, I have not been adding scrap into fresh batches because the fresh wax just works a little too nicely to tinker with any farther. Sure, it can most likely be done, but the present process flow uses the fresh wax alone for the first two castings without adding any scrap. This is being written in December, 2014 and it documents this time period.
Up until close to the end of the 2014 blank production season, I was casting the 2 blanks from the fresh wax, then immediately after those two blanks were finished, shaved, and tested, I'd move right off into cooking up a small scrap batch just enough to cast one more cylinder.
That mixing and cooking is fairly involved and takes the better part of an afternoon, just to get that little scrap batch ready for casting the 3rd blank. It involves scraping all surfaces of the (2) cutoff ends from the previous castings to clean them up making them ready to melt and reuse. Those (2) cutoff ends, plus the (1) cutoff end from the previous Scrap Run blank, plus the leftover wax from the recent fresh batch add up to enough wax to cast another blank, and then to have some amount of leftover scrap wax.
After having used this general process format for several years it slowly became evident that a small amount of fresh stearic needs to be added to these scrap batches in order to keep the wax properly conditioned for casting. Instead of waiting until the need for additional stearic shows up as a visible sign in the castings, it was found that there is a small standard maintenance dose of stearic which can be added to every scrap batch which keeps these batches under constant control, and as such, no visible signs of a stearic deficiency ever show up
In rough terms, it works like this: If you wait until problems show up such as excessive shrinkage, then about 2.5% by weight of added stearic is required in order to bring the batch back into balance. The price one pays for proper conditioning for good casting is that any too much stearic starts to bring up the noise level slightly. More stearic means more noise. Not enough stearic brings on surface wrinkling and excessive shrinkage. It is a very touchy and sensitive balance which must always be watched because it changes every time the wax is reheated to be cast.
On the other hand, if a smaller amount of fresh stearic down around in the range of 1.0% to 1.4% is added to each small scrap batch every time, then the noise can be kept very low and also the casting properties are maintained and excessive shrinkage and wrinkling are avoided.
But that's all a lot of work to go through each time in order to cook up a perfectly balanced scrap batch to cast only one blank!
A more efficient method is this:
Fresh wax batch: Cast 2 blanks.
Save leftover wax.
Fresh wax batch: Cast 2 more blanks.
Save leftover wax.
Now take the (4) cutoff ends plus the leftover wax from the (2) fresh batches, plus the cutoff (2) ends from the previous scrap run blanks, weigh that all up and add about 1.25% stearic and cook that up to make it ready for casting. This now yields (2) more scrap blanks, with plenty of leftover scrap for next time.
The end result of this extension of the process is that now with this method, every cooking session yields 2 blanks. It makes better use of the time involved in cleaning the scrap, weighing it, then calculating and weighing the added stearic plus it better makes use of the cooking time.
Meta scrap is a term I came up with which attempts to relate the phenomenon of an endless scrap cycle which contains an ever decreasing amount of scrap from the very beginning of a scrap run. The leftover scrap is constantly being renewed with recent scrap each time it is used, however some of the original scrap is always present although in a progressively decreasing amount.
Example: Say we start out with a fresh wax batch and cast some blanks, saving the leftover wax plus the cutoff ends. For this example we will assume there is no prior scrap saved, this is the start of a new scrap run. As such, the only scrap now available are the two cutoff casting ends plus the leftover fresh wax. Available scrap: 1 tail end of fresh batch, plus 2 casting ends. Not enough to make more blanks.
Another fresh batch is made and 2 more blanks cast. This now yields 2 more ends plus 1 more piece of leftover wax from this batch. Now the total available scrap is: (2) leftover chunks from (2) batches, plus (4) cutoff ends.
This scrap is cleaned, combined, stearic added, then cooked. It is used to cast 1 more blank which is a scrap run "SR" blank. (These blanks are noted on the title end with the letters "SR" in the serial number extension to indicate they are Scrap Run blanks)
The whole gist of the Meta Scrap idea now comes along: Consider the leftover scrap wax remaining after this (1) "SR" blank has been cast. It is leftover scrap.
This leftover scrap is not quite enough to cast a blank so it gets cleaned, weighed, and bagged.
Now another fresh batch is made and 2 blanks cast from it. A 2nd fresh batch is made and 2 more blanks cast from it.
Total available scrap now is: (2) leftover chunks from ends of those 2 recent batches, plus (4) cutoff ends from those (4) blanks, plus (1) cutoff end from the prevous "SR" blank plus the leftover bagged Meta Scrap from the previous run.
Now the process starts to sink in and take hold because this Meta Scrap has wonderful audio and casting properties as it ages throughout many repeated cookings.
Soon the amount of meta scrap builds up so that it can't always be all used, because it needs to remain roughly 40% of the total in any one "SR" batch. So, arriving at proportions of recent scrap being 58.75%, meta scrap being 40%, and fresh stearic being 1.25% becomes a requirement when weighing out the ingredients prior to combining and cooking.
The gist of this is that the Meta Scrap chunk always gets added to the most recent scrap batch. This can continue for years until the Meta Scrap starts to get so contaminated that it must be eventually set aside. When this happens, a new scrap cycle is started and it takes a few of the smaller sub-cycles in order to get it up and running to its fullest working mode.
A typical long scrap run can last for a few years and extend over the course of 100 blanks or so before the Meta Scrap needs to be set aside due to contamination. This contamination can be envisioned as being roughly the same as boiling water repeatedly in a tea kettle. Eventually the minerals build up because the water evaporates, leaving them there. More water is constantly being added and boiled off but the minerals do not boil off, they instead stay in the kettle where they accumulate.
Steam locomotive boilers work in exactly this same way, they eventualy concentrate minerals which must be removed by unscrewing the washout plugs and washing out the boiler to get the gunk out.
Brown wax for cylinders works this way too because the stearic is volatile, and it does boil off and it escapes as vapor, leaving solids behind which stay there. Only with the cylinder wax, there is very little of this activity, the accumulated contamination is very small indeed, so it takes years for it to build up to an intolerable level which could lead to objectionable noise in high quality blanks.
The contaminated meta scrap is saved for future experiments where by some sort of micron size filtering can very possibly be used to remove the contamination. It is excellent wax, it just has a bit too much gunk in it for first-rate cylinders.
Now that some background on this topic has been explained, here are the serial number codes which document all of it:
The blanks which are made from the fresh wax with no scrap added are just the plain numbers such as M267.
The Meta Scrap blanks are noted as follows:
M268-SR1B19. Those numbers mean:
Blank M268, Scrap Run number 1, blank number 19 of Scrap Run 1.
It should be noted that as a Meta Scrap run progresses, it still contains some few molecules of the first batch of wax which was used to start the run. The amount of this original wax used at the start of the run is always ever-decreasing, but it never gets all the way to zero. It approaches zero, but it never gets there.
Kind of the same as getting ever closer to something by halving the distance from it each step you take. You will get close, but you will never arrive at that location.
This has been an explanation of the "SR" series of dark blanks.
Here are some actual numbers to add a bit more detail to the above verbal description:
Let's start with a typical 334 gram wax batch. Two castings are made, each of which weighs about 120.3 grams. That leaves 93.4 grams of wax left over after having cast those 2 blanks.
Do this three times and now there is about 280 grams of wax left over from the 3 batches. Each cutoff end from a casting weighs about 13.37 grams. There will now be 6 of these ends, so that totals about 80 grams. Add it all together and it comes to about 360 grams of available scrap wax. (in actual practice this can vary between about 330 ands 360 grams)
To prepare this mixture for casting, a small amount of fresh stearic is added. The range can be from around 1.25% to 1.40% depending upon the overall condition of the wax. If 1.4% is used that would come to adding 5 grams of stearic. The whole is heated to 232 degrees C and held there and stirred for 20 minutes, then allowed at least 5.5 hours to completely cool before casting.
Usually about 3.4 grams will be lost to vapor from this cooking.
Two Scrap Run blanks can be cast from this batch.
That will then leave about 120 grams or slightly less left over. This is the start of a new scrap run. This is the first new meta-scrap. It gets weighed and bagged, along with the cleaned-up ends of the 2 scrap run blanks just cast. That total amount of saved meta-scrap will be about 147 grams.
Next, 2 more fresh wax batches are made and 4 blanks cast. This leaves 93.4 grams times 2 of leftover wax. (187 grams), plus the 4 ends being 13.37 each for a total of 53.5 grams, and that all adds up to 240.5 grams.
Add this all together and the total scrap becomes 387.5 grams. Note that 240.5 grams of this is the "recent" scrap from the 4 blanks just cast, and the remaining 147 grams is the "meta scrap" left over from the previous scrap blanks cast.
Note also that 147/147+240.5 = .3794 which shows that this scrap mixture contains 37.94 % meta scrap in the total amount of 387.5 grams of scrap.
The target is 40% meta scrap, and it takes a few cycles to build up to that before meta scrap has to be left out in order to hold the amount down to 40%.
So now that all gets put into the pot and weighed, then 1.4 % stearic added (387.5 x .014 = 5.4 grams). Then the whole gets heated to 232 C, cooked for 20 minutes and the 2 blanks are cast from it.
This process gets repeated many times, always re-using the leftover meta scrap and the recent scrap. It slowly converges on the 40% mark, then it needs to be held there by only using enough meta-scrap each time to assure 40% meta scrap.
So, over the long term, it very closely averages out to 40% meta scrap.
In order to be able to calculate the remaining amount of original scrap contained in any "SR" blank as this continuous process plays out, it is easily solved by calculating using .4 as the factor.
The first SR blank contains .4 scrap by weight. The 2nd SR blank contains .4 times .4 original scrap by weight. The 3rd SR blank contains .4 x .4 x .4 original scrap be weight. The content of original seed-scrap remaining in any successive SR blank can be calculated by taking the number of the blank in the run and multiplying it by .4 raised to the power which is the number of the scrap blank within the particular run it comes from.
Here is a table of the first few:
| Blank x | 0.4 raised to the x power | % original scrap |
| 1 | 1 | 40% |
| 2 | 2 | 16% |
| 3 | 3 | 6.4% |
| 4 | 4 | 2.56% |
| 5 | 5 | 1.02% |
| 6 | 6 | 0.41% |
| 7 | 7 | 0.16% |
| 8 | 8 | 0.07% |
| 9 | 9 | 0.03% |
| 10 | 10 | 0.0105% |
It approaches zero, but it never quite gets there.

And now for something completely different.....
A blank form: (click here for larger image)
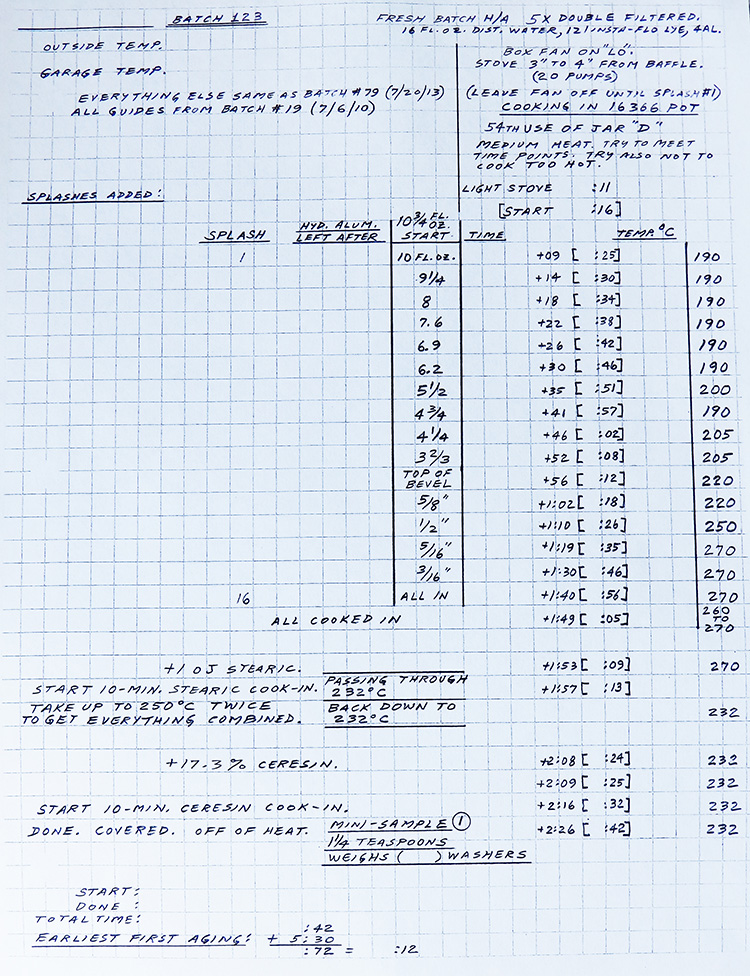
A form filled out while making the batch: (click here for larger image)
Back of form with batch information: (click here for larger image)

